Swiss Chard
Featured Food January 2021
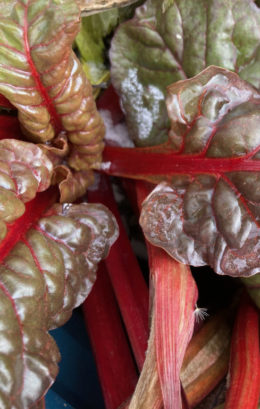
It’s not as common as spinach or lettuce, but this leafy vegetable is a delicious one to discover. The stems add bright and bold color to the garden. The plants are easy to grow, and good to eat, too!
Let’s learn more about this leafy giant…

Swiss chard harvest

Swiss chard seeds
Scientific Name
Beta vulgaris
Colors
Stems can come in white, pink, red, orange and yellow
Other names?
Swiss chard is also known as “silverbeet”
Nutritional Facts
Swiss chard contains significant amounts of many nutrients, including:
- Vitamin A
- Vitamin C
- Vitamin E
- Vitamin K
- Magnesium
- Potassium
- Iron
- Manganese
- Copper
It also contains beneficial compounds known as “flavonoids”
Caution: if you have a family member who is sensitive to it, Swiss chard does contain oxalate. Some people may prefer to avoid eating it, especially raw.
(Sources: WebMD.com and whfoods.com)
Growing Swiss Chard
Seed packets cannot decide on this. Some say to start “in place”, from early spring through mid-summer. Others say it is okay to start the seeds early indoors and transplant out after.
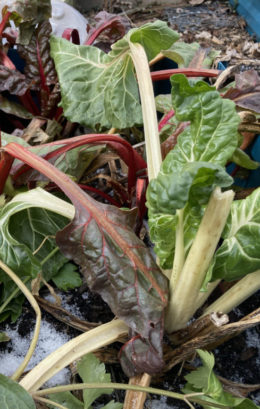
Since I didn’t read the packets as closely, and since I felt like trying, I started my seeds inside last year. The little plants were then transitioned to outside over a few days in the spring, and then planted into the raised garden bed. They did wonderfully, and now almost 12 months after I started those little seeds, they’re still taking advantage of the warmer January weather we’ve been having this year (2021).
When they’re outside, the plants want rich soil, plenty of moisture, and would love to have you add some compost for them.
When starting indoors, start at least 5-6 weeks ahead of when you plan to move them outside, and they can move outside around the time of last frost (since they will tolerate a little).
If you’re starting them outside, their frost tolerance will let you start them in the spring before the final frost.


- White chard and red chard, surviving a little bit of winter weather
Harvesting Swiss Chard
Chard stems are a bit tough. It is easiest to use a pair of scissors to cut the chard leaves, one at a time, near the base of the plant. Then trim any parts of the stem or leaves that are brown or have holes.
Rinse the leaves and stems in cool water to remove any dirt or hiding insects, and then lay them on a kitchen towel or paper towel, or in a large colander, to dry off.
Chard as Food
Now let’s talk about the tasty side of Swiss chard.
Leaves can be enjoyed fresh, and some people will add them to salads, or blend them into a smoothie.
Leaves can also be cooked, and boiling or sautéing are the most common ways to prepare them.
While some say that only the stems from the Fordhook giant variety are edible, others say (and I agree) that cooking or pickling the stems makes them quite edible.
What is a “flavonoid”, anyway?
Flavonoids, or “bioflavonoids”, are substances found in plants that are brightly colored, and that provide health benefits when eaten. Bright colors seen in fruits and vegetables are evidence of these flavonoids.
Source: “Introduction to Clinical Nutrition”, 2nd ed., by Dr. VM Sardesai, Marcel Dekker, Inc.
Where did Swiss Chard come from?
Not Switzerland! Swiss chard is actually from the Mediterranean region originally.
Preserving Swiss Chard
Swiss chard plants can provide you with a LOT of leaves to eat! Sometimes it can be difficult to keep up with so much fresh garden produce. Fortunately, there are ways you can preserve and store your chard for use in the future. If it becomes one of your favorite foods, it will be even more exciting to have some to eat all winter long!
Freezing Swiss Chard:
- You will want to separate the leaves from the stems: cut the leaf off of the stem, and put the leaves and stems into separate bowls
- If leaves are large, cut them into smaller sizes
- Cut longer stems into segments that are 4-6 inches or smaller, so that they’re easier to put into a pot
- Before you freeze the chard, you will want to “blanch” it – which means briefly putting it into boiling water (this will require an adult’s help for our young readers!)
- With the help of an adult, fill a large pot or dutch oven-type pan halfway with water. Bring this water to a boil.
- Using tongs (and consider wearing an oven mitt), gently lower the chard stems into the boiling water. Leave them there for 2-3 minutes, and then carefully remove and place in a strainer or colander, letting them drain and cool. Then repeat the process with the leaves, but only for one minute.
- Once the stems and leaves have cooled, they can be placed into freezer storage bags or containers. If using bags, squeeze out all the extra air you can before you seal it tightly
- Label the containers or bags with the contents and date, then place in the freezer. Done!
Once you’ve grown your Swiss Chard, what can you do next? Let’s explore some cooking options with a few recipes!
